
I see this question pop up on photography forums like clockwork — every few months, someone asks: “How do I make a GIF in Lightroom?” And the answers are always the same: “You can’t.” For a long time, that was just the reality we all lived with.
Here’s the thing — Lightroom Classic is an absolute powerhouse for organizing and editing photos. RAW processing, batch editing, metadata, keywording, export to every common image format you can think of. But animated GIFs? Nope. Adobe never built that feature, and after 17 years of Lightroom, I think it’s safe to say it’s not on their roadmap. Ever.
But that doesn’t mean you’re out of luck. I’ve used three different methods to go from “burst photos sitting in Lightroom” to “finished GIF” — and the newest one actually keeps you inside Lightroom the entire time. That’s the one I use on every wedding now.
Can Lightroom Export GIF?
No. Let’s just rip off the band-aid.
Lightroom Classic cannot export GIF files. Not animated GIFs, not even static GIFs. The export dialog gives you JPEG, TIFF, PSD, PNG, DNG, and the original format. That’s your lot.
There’s also no way to create any kind of frame animation or photo sequence animation. No timeline, no frame editor, no animation preview. Sure, the Slideshow module can spit out a video, but that’s built for client presentations with fancy transitions and music — not frame-by-frame animation from your burst photos.
And that’s what makes it so maddening, right? You’ve got 20 burst photos sitting right there in Lightroom, edited to perfection. You can see them as thumbnails. You flip through them in the filmstrip and they practically animate themselves. Your brain goes “that’s a GIF!” but there’s no button to make it one.
I hit this wall myself hundreds of times before I did something about it. But first, let me walk you through all three options.
Method 1: The Photoshop Route
This is the answer everyone gives, and yeah, it works — but honestly, it’s a slog.
The short version: export your photos as JPEGs from Lightroom, open Photoshop, use File > Scripts > Load Files into Stack to load them as layers, open the Timeline panel, create a frame animation, make frames from layers, set timing and looping, then export via Save for Web.
The long version is 12 distinct steps and takes 15-20 minutes per GIF. I’ve written a complete step-by-step guide to the Photoshop GIF workflow if you want the full walkthrough.
But here’s what really bugged me — it’s not even the time. It’s the JPEG roundtrip. When you export from Lightroom as JPEG, you’re baking in all your edits at a fixed quality level. Change the white balance later? Tweak your color grade after the client gives feedback? Cool — now you get to re-export all the JPEGs and redo the entire Photoshop process from scratch.
Your Lightroom edits and your GIF live in completely separate worlds. Touch one, and the other is instantly out of date.
Oh, and you need Photoshop. That means an Adobe Creative Cloud subscription on top of Lightroom — $54.99/month for the Photography plan. If you’re only using Photoshop for GIFs, that’s one expensive GIF maker.
Method 2: Online Tools (ezgif, giphy, etc.)
If you don’t have Photoshop, online GIF makers are the next option. Sites like ezgif.com, giphy.com, and imgflip.com let you upload photos and create animated GIFs in the browser.
The workflow:
- Export JPEGs from Lightroom (same as Method 1)
- Go to ezgif.com > GIF Maker
- Upload your JPEG files (usually limited to 2000 files total, 100 MB max)
- Set frame delay (100ms = 10 fps)
- Click “Make a GIF”
- Download the result
It’s faster than Photoshop — maybe 5 minutes instead of 15-20. And it’s free.
But the downsides are real:
- Same JPEG roundtrip problem. You still lose your non-destructive workflow.
- File size limits. Most free tools cap uploads at 50-100 MB total. A burst of 20 high-res JPEGs can easily exceed that.
- No auto-import. The GIF downloads to your browser’s download folder. It’s not in your Lightroom catalog. You have to manually import it and fix the metadata.
- Limited control. Basic timing and size options only. No preview before committing.
- Privacy. You’re uploading client photos to a third-party server. For wedding photographers handling intimate moments, that’s worth considering.
- Quality ceiling. These tools optimize for speed, not quality. The dithering algorithms are basic and the output often looks noticeably worse than Photoshop’s.
For a quick one-off GIF when you’re in a pinch, online tools do the job. For a regular production workflow — say, 10-15 GIFs per wedding, 40 weddings a year — they create more headaches than they solve. Trust me, I tried.
Method 3: Burst2GIF Plugin (Inside Lightroom)
This is the method that actually keeps you in Lightroom. And full disclosure — this is the plugin I built, because after 200+ weddings I got tired of the other two methods.
Burst2GIF is a Lightroom Classic plugin that creates GIFs and MP4 videos directly from your photo library — no export, no external app, no browser upload.
Here’s exactly how it works:
Step 1: Select Your Photos
In Lightroom’s Library module, select the burst photos you want to animate. They can be RAW files, JPEGs, TIFFs — anything Lightroom can display. The plugin reads Lightroom’s rendered previews, so all your Develop module edits are included automatically.
Step 2: Launch Burst2GIF
Go to Library > Plug-in Extras > Burst2GIF. The plugin dialog opens with a live preview of your animation. You can see exactly what the GIF will look like before you export anything.
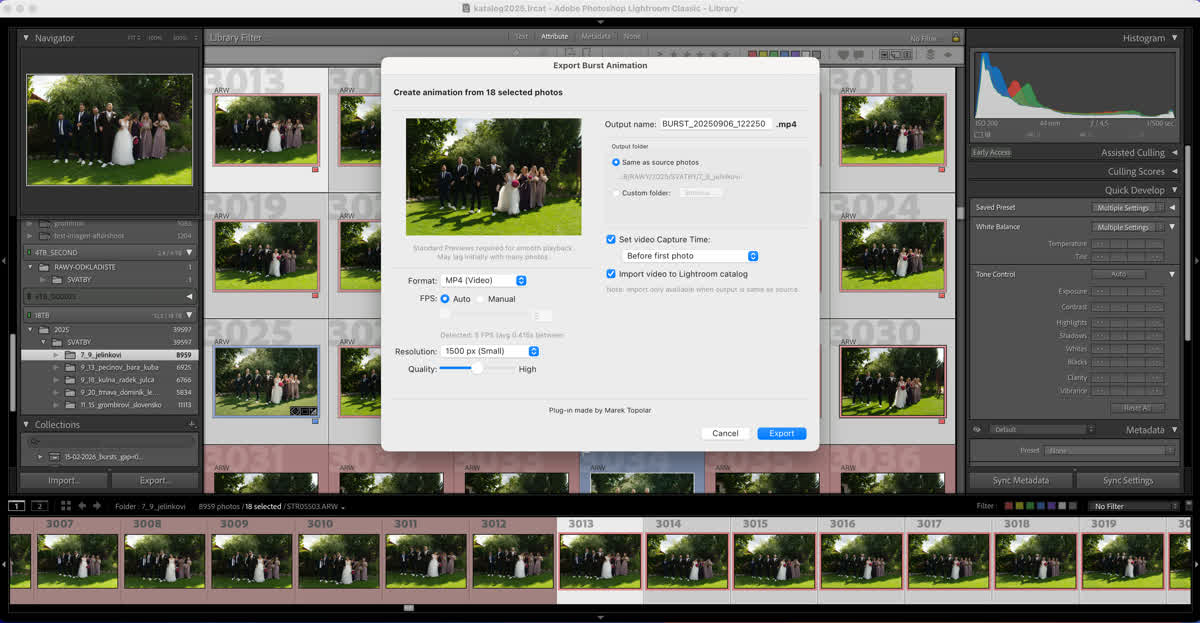
Step 3: Configure and Export
Set your options:
- Format: GIF or MP4
- FPS: Auto-detect from EXIF or manual override
- Resolution: Multiple presets or custom dimensions
Click Export. Done. The file appears right next to your original photos in the Lightroom catalog, with the correct capture time so it sorts chronologically.
Total time: about 10 seconds. Not 15 minutes. Not 5 minutes. Ten seconds from selecting photos to having the finished file in your catalog. I still can’t believe how much time I wasted before this existed.
Burst2GIF Settings Explained
The plugin is pretty straightforward, but a few settings are worth explaining.
Auto-Detect FPS from EXIF
Modern cameras record the sub-second timing of each photo in the EXIF data (the SubSecTimeOriginal field). Burst2GIF reads this data and calculates the actual shooting speed automatically.
So if you shot at 10 fps on your Sony A1, the animation plays at 10 fps. Shot at 20 fps? Plays at 20 fps. The motion looks natural because it matches the real-world timing. No guesswork.
Manual FPS Override
Sometimes you want to speed up or slow down the animation for creative effect. Set a custom FPS to override the auto-detected value. Lower FPS (5-7) gives a dreamy, deliberate look — I use this for slow walks down the aisle. Higher FPS (12-15) for smooth, almost-video motion — great for confetti exits and first dance spins.
GIF vs MP4
GIF is the universal format — it works everywhere, loops automatically, and every browser supports it. But GIF is limited to 256 colors per frame, which means photographic content gets dithered and grainy. You know that crunchy look? Yeah, that’s the 256-color limit doing its thing.
MP4 (H.264) supports millions of colors, produces files 80-90% smaller, and looks dramatically better. The trade-off: not all platforms auto-loop MP4, and some gallery systems don’t support inline video playback.
For social media and messaging, GIF is safer. For client galleries (especially Pic-Time and similar platforms that support video), MP4 is the better choice. I’ve got a full breakdown in the GIF vs MP4 comparison.
Smart Capture Time for MP4
This is one of those features that sounds small but saves me so much frustration. When Burst2GIF creates an MP4, it sets the file’s creation timestamp to match the first photo in the sequence. This means the video sorts chronologically alongside your photos when you upload everything to a gallery.
No more manually dragging the video to the right position between the ceremony and reception photos. It just lands where it belongs. After 200+ weddings, I can tell you — those little time-savers add up fast.
Turn your burst photos into GIFs in 10 seconds.
Free version — 10 exports, no credit card needed.
Try Burst2GIF FreeFrequently Asked Questions
Which Lightroom versions are supported?
Burst2GIF works with Lightroom Classic 10 and newer (released 2020 and later). It does not work with the cloud-based “Lightroom” (no Classic). The plugin API requires Classic.
macOS only?
Yes, for now. The plugin is macOS only. Windows support is in development but there’s no release date yet.
Does it work with RAW files?
Yes. The plugin doesn’t process your RAW files directly — it reads Lightroom’s rendered previews, which include all your Develop module edits. So your RAW files stay untouched, and the GIF reflects your current edit exactly as you see it in Lightroom.
If you change your edit later, just run the plugin again. Ten seconds and you have an updated GIF with the new look. That’s the beauty of staying inside the non-destructive workflow.
Can I use it with any photos, not just bursts?
Absolutely. The plugin doesn’t care whether the photos were shot as a burst sequence. You can use it for:
- Timelapse sequences — 100 photos taken every 30 seconds, animated into a smooth timelapse GIF
- Stop-motion — product photography frames, food prep steps, or any staged sequence
- Before/after pairs — two photos alternating to show the editing difference
- Any series of photos — as long as they’re in your Lightroom catalog, the plugin can animate them
The “burst” in the name is just the most common use case. I’ve had photographers use it for everything from real estate walkthroughs to pet portraits where the dog wouldn’t sit still.
What does it cost?
$29 for a lifetime license. There’s also a free version limited to 10 exports so you can test the workflow before buying.
No subscription. No Creative Cloud required. Just the plugin and Lightroom Classic.
The Bottom Line
Lightroom can’t make GIFs. Adobe hasn’t added the feature in 17 years, and honestly? They probably never will — it’s too niche for their roadmap.
But the workaround landscape has gotten way better. Photoshop works if you don’t mind 12 steps and 15 minutes per GIF. Online tools work if you don’t mind uploading client photos to third-party servers. And Burst2GIF works if you want to stay inside Lightroom and get it done in 10 seconds.
For my workflow — 200+ weddings, multiple GIFs per event, tight turnaround deadlines — the plugin paid for itself on the very first wedding. The math is stupidly simple: 15 GIFs times 15 minutes in Photoshop equals 3.75 hours. 15 GIFs times 10 seconds in Burst2GIF equals 2.5 minutes.
That’s 3.5 hours back per wedding. Multiply by 40 weddings a year and… yeah. That’s why I built the thing. Sometimes the best tool is the one you make yourself because nobody else will.
Further Reading
- How to export GIF from Photoshop: complete guide — the full 12-step Photoshop workflow if you need it
- The complete burst to GIF guide — from shooting technique to final delivery
- GIF vs MP4 for photography — which format is right for your client galleries
Ready to Turn Your Burst Photos Into GIFs?
Burst2GIF works directly inside Lightroom Classic. Select your burst photos, click export, and get a smooth GIF or MP4 in seconds.


